_ _ _ _ _ _ _ _ _ _ _ _ _ _ _ _ _ _ _ _ _ _ _ _ _ _ _ _ _ _ _ _ _ _ _ _ _ _ _ _ _ _ _ _ _ _ _ _ _ _ _ _ _ _ _ _ _ _ _ _ _ _ _ _

Friday 29 January 2021

Cozy Boxy Pullover - Finished

With cut on sleeves, the blouse I showed in the last post has a similar shape to the pullover started in Cozy Boxy Structures. In the past, I've always preferred styles with a high sleeve cap that sits right on the shoulder point as they tend to flatter my figure more while this shape is comforting emotionally with its cozy casualness. It's not always about what looks best on our figure type. Sometimes, it's about how we feel in the garment. 


Mine is loosely based on the pattern Sugar On Top. The only things I kept were the stitch pattern and the basic shape. My gauge is different. I used one colour of yarn. And, I widened the body and... 


... shortened the sleeves considerably. Mine are five inches long and the ones in the pattern are fourteen inches long. The width I chose is the width of a similar pullover I already wear and like. It creates...


... more of a curve over the hip that is less horizontal, more diagonal, and definitely more flattering especially if I'm going to eliminate my waistline. Last year, from spring to fall, I went to a local park every morning with my journal and coffee. I want to do that again this year and can see myself wearing this a lot to keep warm on the cooler days. It'll look good with jeans or a skirt or even a dress. 


Another thing I changed from the original is the hem bands. Mine are 3" in the front and 4 1/2" in the back. The pattern was designed with differing front and back lengths but put the extra length in the back yoke area which meant the horizontal stripes of the stitch pattern would not have been at the same height front to back. I wanted them even so I make the back hem band wider instead. The bands aren't stitched together at the side which creates a soft V shape that will - again - be more flattering than a straight line. LOL - I have tried this pullover on and I do like it and I am keeping it. 

If you knit, do you follow the pattern exactly or make changes as you go? What about with sewing?

Talk soon - Myrna

Grateful - catching up on the unfinished projects I didn't complete in December

Wednesday 27 January 2021

The Cross Over Project - Finished

The control foot for my Bernina is going to take even longer to get here than anticipated so it was either abandon the cross over project or learn how to make buttonholes on my back-up machine and get it finished. I preferred finished. 

The back-up machine is a Pfaff Ambition Essential. When I bought it, I lived in a different city with a Pfaff dealer. Here, there isn't a dealer and I've learned the hard way the importance of having all the feet I regularly use so that when I need the back-up machine, I can actually do the work I want to do. Yesterday, I ordered a perfect 1/4" foot, an open toe free motion foot, an open toe applique foot, and a non-stick foot. Along with the feet I already have, they should cover anything I might want to do. 


There was an excellent video on YouTube for how to use the buttonhole foot and the buttonholes turned out really well. The actual button is inserted into the back of the buttonhole foot and the machine stitches to the exact size needed by measuring the distance and NOT by the number of stitches. Previously, I had a machine that counted stitches and that didn't work with thick fabrics. Although, to be fair, I haven't tried this one on thick fabrics yet either. The blouse is made with rayon fabrics. 


As part of my Christmas present, my friend Caroline gave me a collection of buttons including these white ones with gold insets. They were perfect with the fabric so I got to use them right away. That so rarely happens. 


I used both the polka dot and the striped fabrics for the button band and collar. It was a bit more work but that's okay. The details are worth the work and they make sewing a basic top more fun.  


The stripes show on the inside of the sleeve from the side view and the polka dot trim runs from center front all the way around the hem and up the button band to the inside collar stand and under-collar. 


I'm not sure if I'll ever wear the blouse. When I try it on, I'll see. Quite often after I sew something, I'll put the garment on my dress form and just enjoy the fun of the make and that it is currently "perfect". It may sit there for days or weeks and then, once I try it on, I'll either love it and/or notice things to change for next time or hate it and never make it again. In this case, I sewed this garment to start the new year with a style I don't normally wear, to test the style and the pattern, and to have fun mixing up fabrics. From that perspective, it's a win-win. 

Do you enjoy mixing up fabrics?
When's the last time you tested a new style and what did you think?

Talk soon - Myrna

Grateful - a good buttonhole on the back-up Pfaff

Friday 22 January 2021

DONE With That Fabric

The renovations are starting to wind down. There are only a few more things for the contractors to finish and then the rest of the work is up to me. It's only been eight weeks, including Christmas break, since I moved in and I definitely appreciate how quickly the work has been done but I am looking forward to having my home to myself and to finding a new rhythm. 


I thought I had shown these pieces in an earlier post but I can't find where so maybe not. They are the two sides of a purse made using hand painted fabric... for the third time. I tested a pattern and took it apart, and then tested another pattern and took it apart, and then cut those pieces down to this smaller size and sewed it together.  


It's a rectangular shape meant to be a cross body bag with a denim strap in the same fabric as the zipper section. The zipper was also recycled three times. The white lines are chalk from a previous rendition and would wash out. 


If I have a choice, I prefer a drop in lining. I didn't in this case and used binding to wrap the visible seam allowances. It's made from a half meter of cotton fabric that was also a remnant. When I make binding, I make a lot of it and put the rest in stash for future projects. 


For some reason, I decided not to check the seams before sewing the binding in place. I didn't want to turn the bag and then turn it back so I just sewed the binding on. A mistake. When I did turn the bag, there were three spots in corners where I hadn't stitched in deep enough. And that's when I was DONE with that fabric. I originally made it as a sample for a painting exercise so it was already a remnant and then I used it for three purse renditions and now DONE, GONE, GOOD-BYE, we are breaking up. I have no more enthusiasm for this remnant relationship however...


... there are still bits and pieces to play with at a later date. The painted ones will be used for jewelry and the denim ones are enough for another purse or accents on a garment. This is what I mean by remnants breeding in the night. They both started out as one piece and they've been used several times and are now in multiple pieces and can still be used. At some point, I'll either be so bored with them, or they'll be so small, that it's time to move them along. 


One of the things I discovered last year is that I sew a lot of my clothes for a particular event like a workshop. If I am going on a five day retreat, I will sew five new outfits that then become part of my regular wardrobe. I was scheduled to take four workshops last year, none of which happened, so no retreat wardrobes were sewn, and virtually no new clothes went into my closet while some have definitely worn out making my minimalist wardrobe even more minimal. Yesterday...

... I stood there staring into the closet and there was nothing I wanted to wear. I have clothes but I'm so bored with them and even with my jewelry... which says a lot... because I have a HUGE collection of statement necklaces. It's time to sew something new for me. 

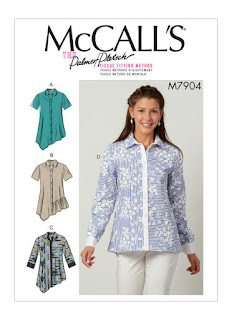
I looked up the reviews for McCall's 7904 last night. As I thought, it looks best in a fabric with a soft drape, maybe linen. The shape of my right hip is slightly larger and lower due to an accident several years ago. It limits some of the styles I can wear like flowing pants where one hemline lifts or pencil skirts that draw attention to the asymmetry. I think this style will actually work well because it's already asymmetrical. The pattern was in stash. I'm trying to buy less of those as well. 

Do you ever use remnants over and over again like I'm describing?
How do you know when you're done with that fabric? What happens? 

Talk soon - Myrna

Grateful
- the potential of endless bits and pieces of fabric

Wednesday 20 January 2021

The Buy Less Year

Goals are not black and white. They are more than actions attained or not with no in-between. In fact, goals work best when they can be fine tuned while we walk in that direction and learn more about what we didn't know. At best, goals are simply a starting point.


And yet, the term goal setting has taken on a rigid, all or nothing, overtone that doesn't appeal to me. Words matter - to us and to those we hope will support us. I prefer to use the phrase setting an intention so that I can move in a new direction, step-by-step, correcting as I go. I believe that room for adjustment is crucial for success because what I'm really saying is that I want to find a way to do something different. The easiest way is typically by not overcomplicating the issue. 


The amount of storage space in my new studio is slightly less than at my previous studio. I was able to get all of my supplies into the cupboard only it's stuffed full. When I pull out yarn or a piece of fabric, it's hard work getting it back in smoothly which translates into a mess with a lack of flow as opposed to room for fabulous finds. 

I thought about a buy nothing year for roughly two seconds. And let it go. Totally unrealistic. Definitely not attainable. Hardly doable. It would have lasted only until my next trip to the fabric store. I am weak in the face of fabric, especially fabulous fabric on sale, like the linen currently on buy one meter, get two free, at a nearby store.


I'm also somewhat impulsive when auditioning options like the buttons for the turquoise sweater in my last posting. First, I looked through my button collection and chose a darker lime button except I only had three so I went to the store to buy more. The same button was in a different, brighter, dye lot so I bought six of them and six of another green, just in case. When I got home, both were not quite right and I ended up using white buttons from stash. Five out, twelve in, is not going to accomplish any de-stashing. Luckily, the button jars are not stuffed to overflowing like fabric and yarn but even so. 


I believe in supporting those who support us. I try to shop close to home and outward. Our local fabric store is a franchise owned by a couple who live here in the community. The fact that it exists is one of the reasons I chose to move to this city. I couldn't imagine living any place without a fabric store. I am glad it's here and I'd like it to stay so obviously I need to spend some money to help that happen. 


BUT... I also believe in limits and I know that there is an amount of stash that is productive for me and an amount that is paralyzing.  Eighty percent of capacity works. A hundred percent and beyond does not. Since I'm closer to a hundred than eighty, I am calling this the buy less year with the intention of shopping at home first and only buying what I truly need and/or can fit into the studio. 

That means somehow working myself down to that eighty percent level by sewing the fabric, refashioning the garments, playing with the remnants, and knitting the yarn that I already have while trying my hardest not to falter in the face of fabulous fabric on sale and ending up bringing it home and attempting to somehow fit it into an already full cupboard. Including buttons! Including all shiny objects.

The scarf I've shown in this posting is knit from one end to the other starting with six stitches and ending with close to two hundred. It's a free pattern called Cascade by Brian Smith Designs. Mine is loosely based on the pattern. I started out the same six stitches but detoured rather quickly into my own random positioning of stripes. 


I picked the pattern to use yarn remnants from other projects. The pattern calls for five different colours... and I thought I had used five... until I took this picture. There's four in mine. They are similar but not identical in weight with some slightly thicker and others slightly thinner. The really fun part was creating the colour changes. The stitch is a simple garter stitch that increases by one every two rows. Finished, the scarf is really long. Shown on my blocking board below, the wing span is over a hundred inches, possibly because I ended up with more rows than Brian's pattern called for. 


To block the scarf, I started by pinning the straight edge along one continuous line. To get the correct angle, and another straight line on the opposite edge, I placed a measuring tape between pins at both ends and moved the knitting forward until it could be pinned along the edge. 


Then I folded the straight edge back on itself, pinning it along the same line on the board. Once that was in place, I aligned the fold with one of the horizontal measuring lines and determined the second angle. It's not identical. Where needed, the pins are inserted flatter so I can place...


.. the measuring tape along the second angle. I block my knitted items dry rather than soaking them. Once they are pinned in place, I spray the surface heavily with hot water and let it thoroughly dry. In this case, I sprayed the bottom layer first before folding over the second one, pinning and spraying it.


I'm quite happy with how the scarf turned out and there are still remnants from this project to say nothing of the other balls in stash. I have no option but to believe that remnants breed in the night. They are never ending. I guess I'll be knitting more striped items. 

Do you have any spending intentions for your studio this year?
Do you like working with remnants?

Talk soon - Myrna

Grateful
- intentions

Tuesday 19 January 2021

Link To My New Blog

At the end of November, I moved from my house on the pond to a condo on a creek. It's a lovely place to be and the beginning of new directions in my life... including a new blog. I hope you will visit me there and if you like it, please let me know and please share with friends. Thank you. The address is:

One At a Time by Myrna
https://www.oneatatimebymyrna.blogspot.com


Friday 15 January 2021

The Turquoise Sweater: Finished

The parts of this sweater were finished even before the move but hadn't been sewn together yet. Once I started packing, it wasn't possible and I had to wait through some of the renovations to have a large enough, clean enough, space to block it in. I sewed it together yesterday. 


The seam above left is of the shoulder and the one above right is of the underarm/side. I like both. It doesn't bother me that the shoulder seam is visible. The women in my knitting group think that's because I came to knitting via sewing and I'm programmed to sewing-like methods. Okay. It works. I can especially see that with...


.. .the way I pin seams together using stitch markers. I find it easier to align the stitches and seams when they are pre-pinned and I can stitch from marker to marker. It also let's me know where I need to ease in such as around the sleeve cap as shown above. 


I also use the stitch markers to place the buttons. I overlap the two sections, pin the marker in place through the buttonhole, and then sew the buttons to that spot. For this sweater, I tried several different buttons and settled on these white ones that came from stash. Usually, it's hard to find enough of the same button so I'm particularly thrilled that I was able to use what I have. 


Here are the front and back finished. There's no pattern to link to since I used a V-neck style of the same gauge with a vastly different stitch - only for the numbers. The yarn is Berroco ReMix Light. It's one of my favourite yarns and I've knit with it in denim blue, purple, and light grey before and I have some dark grey in stash. I'll be able to use the left overs to make a striped project. 

Next with knitting, I am finishing a triangular scarf knit from remnants that has only a few inches left and then the grey sweater I showed in an earlier posting. I've already sewn the shoulder seams on it but need to add the neckband to determine if my sleeves are the correct length before I can sew them on and the underarm seam. Once the scarf and the grey sweater are done, I'll be caught up to date and can move forward on another project that is cast on but not really started. It's waiting patiently. 

Do you see the cross over of skills from one media to another in your work? Where? 

Talk soon - Myrna

Grateful - the turquoise sweater finished and only two knitting UFOs to go. 

Wednesday 13 January 2021

The Sleeve board: A New Cover

Last week was busy including - unfortunately - a medical emergency with one of the men working on my renovations.  It zapped my energy more than I thought so none of the plans I had to paint, wallpaper, or clean the garage happened. Mostly, I talked on the phone and caught up with friends, read, did a bit of mindless sewing, and moved slow. This is good. 

A control foot arrived in Friday's mail only - SIGH - it wasn't the correct one for my Bernina so I'm still trying to figure that out and waiting to hear back from the shop where I bought it. You'd think they'd know that an addicted sewist without a control foot calls for desperate measures... or perhaps, it's an every day event for them. Without the control foot, or the presser feet I need for the back-up machine, simple stuff was best so...


... I finally finished a task I'd been putting off - a new cover for my sleeve board. What's so funny about this is that the sleeve board is my favourite tool and one I use every day. I even take it to workshops with me! The old cover was done and irritatingly lifting off the board and even so, a new one wasn't getting sewn. I imagine you know how that goes.

My not so brainy idea was to use an ironing board cover to cut the smaller sleeve board pieces from because I thought it would come with half decent padding only not in this case. It was more like a flat piece of polyester. I wondered how well it would survive long term use with extensive steam and heat so...


... I added two layers of cotton batting underneath once the cover was complete. To make the pattern, I pinned the old cover to the ironing board material and then used the edge of the presser foot to enlarge it slightly, cut on the stitched line, zigzag finished the raw edges, and added bias tape all around for a casing. 


And then I thought about an upcoming gift exchange with a friend and two others that are having birthdays in early February and they all sew so I decided to make two more covers making three for them and then sew a different one for myself.

All I need now is someone to cut out the parts of three more sleeve boards so I can screw them together, cover them, put them in a box, wrap them, send them, and happy gift. Hopefully one of the workmen, or a friend who likes woodworking, will be able to do them for me otherwise I'll need to go to my storage unit and find the tools to do it myself. I'd rather not. I'd rather continue setting up the house first. I didn't plan to deal with tools until spring.  


My cover ended up being sewn out of denim scraps and leftover polka-dot bias. I continue to be amazed at what I can do with bits and pieces that at one time I would have thrown out. It's like a free cover. YES YES!


And then, on Monday, I drove to Vernon to the dealer's shop to get feet for my back-up machine... which I managed to do... as painful as the experience was... by basically hand holding and selling them to myself. The one above left is an embroidery/free motion foot and the one on the right is a candlewicking foot although I bought it because it's open and will be easy to see through.

The saleswoman didn't know, and didn't seem to care to know, anything about this brand of machines even though they are the dealer. She couldn't answer any questions, didn't want to open the packaging to try the feet on their own machines because then they'd be used, and had to be prompted to look online for the information we needed. I'd taken a foot from my machine and finally convinced her to try it on a floor model and then sell me feet that would fit that model. It took repeated prompting. She couldn't understand why I wanted parts for this brand when she's only sold a couple of them in the three years she's been selling machines and hundreds of Janome's. Hmm... maybe because that's the brand I have. Just saying!

BUT... it'll make life a lot easier while I wait for the control foot for my Bernina. I've realized that it's not enough to have a back-up machine. It also needs to have all the accessories that I am used to using so that if it is required, as in the case right now, it is completely ready to go. I may trade it in for a Janome but only because that is the brand sold at the shop in my city and because I've had one in the past and really liked it. But not now. Right now, I want to sew. 

What is your favourite tool?

Talk soon - Myrna

Grateful - presser feet for my back-up machine

Friday 8 January 2021

Cross Over Project - Update One

You'll probably get sick of hearing me say this only I believe it's an important criteria for this year - that I am sewing garments I will wear and are truly me and that I am also sewing garments I won't wear but will be a lot of fun to sew. Underlying that decision is one to lean into the fun and the creativity of this art form and of dressing myself as myself. That said, I am hopeful it will prove to be a win-win goal and that most garments will fit into both categories and be fun and wearable. 


In an earlier posting, I talked about the cross over project chosen for this year - McCall's 8001 - a blouse. I chose it because I would like to wear blouses more but need to figure out which styles and fabrics work best on me and because it required a soft drapey fabric that I think may be a key ingredient in what works but isn't my first choice of fabrics. The dropped shoulder of this pattern is less flattering on my bottom heavy figure as is the lack of a defined waist - since I have one. I'll be evaluating what I think of that. The elements that will be fun to sew are the hem bands, the yoke, and the collar/collar stand. 


Since I don't wear a lot of blouses, I don't have a lot of blouse fabrics in stash especially ones that will drape. At our local store, I chose the rayon floral print at left because it was the best of the options available. Normally, I wouldn't choose a fabric with so much brown in it but this is small town living! I'm grateful to have a fabric store. Since there wasn't enough yardage left on the bolt for the entire project, I combined it with the stripe and the dots from my stash. The three "play" together nicely. 


To start, I cut out the two fronts, the upper yoke, the back, and the top side of each hem band and then worked step-by-step making decisions about what fabric to use where as I went along.  I was concerned that the hem band would create a strong horizontal line that would visually widened my hips. By choosing the floral print for all of the back sections, the look is more blended and less choppy when sewn together. Adding the striped flange draws the eye up to my shoulders which are narrow and visually widens them which is MUCH better than widening my hips. It also shows off the style lines on the yoke adding a moment that is quite fun. And fun to sew. 


Because rayon is so amazing at stretching, I interfaced the inside yoke to be the stabilizing point of the garment that I could correct back to. For this piece, I used the striped fabric which you can also see used as the inside sleeve band. 


The pattern does not have two separate pieces for the band. It intends for you to use the same fabric folded so I drafted separate pieces cutting the inside band bigger than the outside one so I could wrap the fabric around the edge creating the look of binding. When wearing the garment, the inside band will be visible. 


You could see in the earlier image that I did the same thing with the bottom hem band using the polka-dot fabric. Dark around my hips is better for my body type than light whereas keeping all of the light details near the top of the garment will draw the eye up. 


I have been studying fashion for a really long time and still find it fascinating especially the juxtaposition between what "they" say suits my body type and what I know suits my fashion personality. I find it valuable to use the "rules" in situations that work for me like this blouse and to completely ignore them in others. For instance, I am far more likely to wear a solid top with a printed bottom than the other way around because I'm a huge fan of statement necklaces and they - positioned against a solid and darker background - will draw the eye up. I think clothes should be fun but ultimately I want to be seen and not overpowered. This solid on top, print on the bottom, formula has basically become my uniform. 

How do you feel about fashion rules? What is your uniform?

Talk soon - Myrna

Grateful - learning to mix prints successfully