_ _ _ _ _ _ _ _ _ _ _ _ _ _ _ _ _ _ _ _ _ _ _ _ _ _ _ _ _ _ _ _ _ _ _ _ _ _ _ _ _ _ _ _ _ _ _ _ _ _ _ _ _ _ _ _ _ _ _ _ _ _ _ _

Monday 30 May 2022

The Last Week & Free Stuff

This is the last week of the year of turning sixty. Today, I'm fifty-nine and on Friday I'll be sixty - how amazing is that! The opposite of older is dead. That reality certainly puts things into perspective. I'm happy to be getting older and to be heading into a new decade. I can't explain why it feels like a significant shift, but it does and it's exciting.

In particular, I'm thrilled to have a project to work on. With the recent changes in my personal life, I needed an engaging topic to develop a business around that not only utilized my skills and abilities but was fun. In my opinion, fun is even more vital as we age. I'd prefer to earn income having fun, to have more fun in my life, and to help others have more fun. 


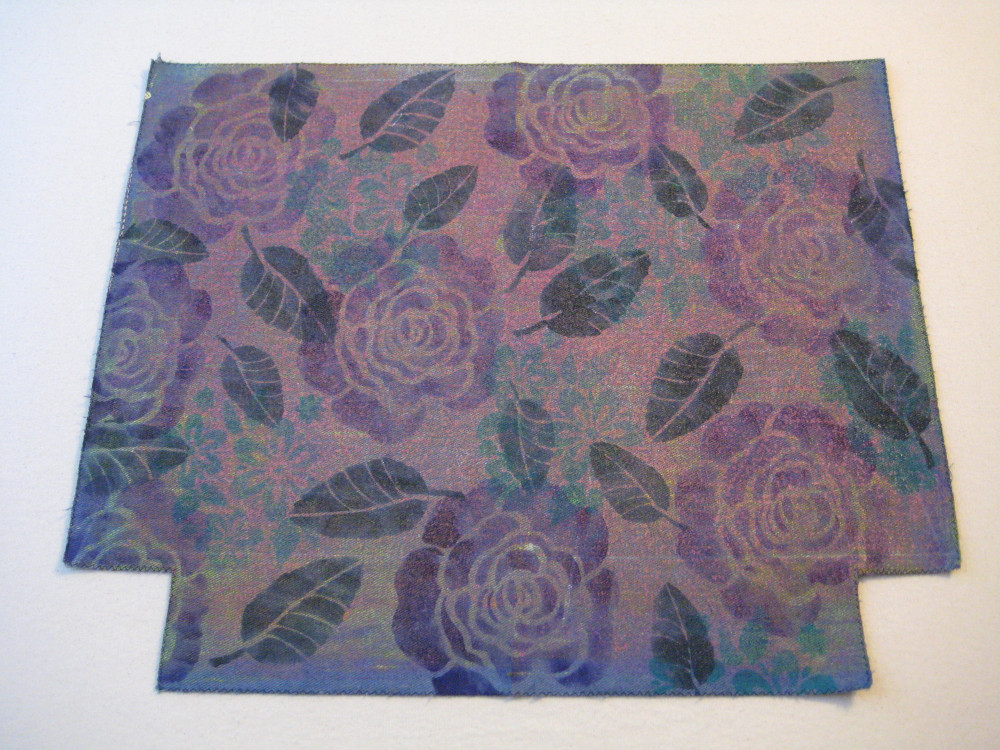
I picked handbags not because of any research about the topic's potential but because I've been making them since my teens. I obviously enjoy them. To me, handbags are a practical luxury and a blank canvas. There are so many ways to see the silhouette and fill the form. 

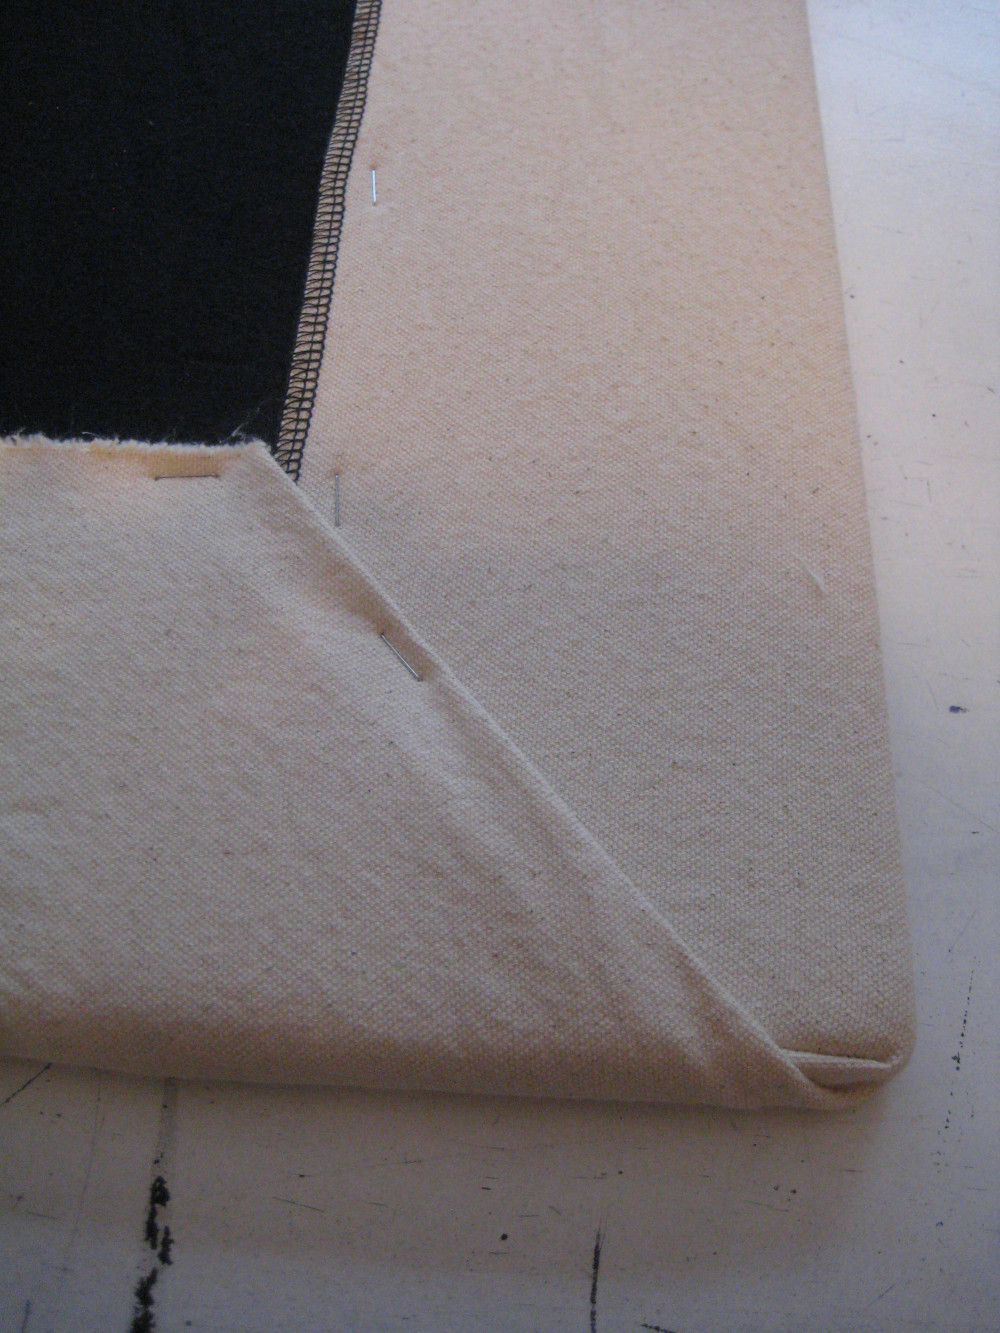
Last week, I finished sewing and making notes on this basic boxed tote and I'm currently writing what will be a free pattern. Yesterday, I ordered a camera for making videos with plans to start both a YouTube channel and create online workshops including a free one showing how to sew this tote. 


The workshop will include many of the tips and tricks I've learned over the years to get flat seams, well matched intersections, less bulk, and a clean finish. I've always been fascinated by the most efficient, most professional way to create something. One blog reader described me as a dog with a bone. I just have to figure it out and then - when I do - I have to pass it on. 


Whatever it is that makes it work well has always been too good to keep to myself and I loved sharing what I knew before with my previous patterns, books, and workshops. While the topic is different, the desire is the same. I'm looking forward to helping my viewers create beautiful bags.  

I am working steadily on the first pattern and the first workshop and it's a STEEP learning curve. So much is different from when I did this before, over a decade ago. It's familiar and it's not. I'm learning new software, steps, and procedures and hope to have things functioning by the fall but I can't guarantee a time frame right now. I'm also developing a new website that will launch at the same time. SO EXCITING. 

One of the women I went to the retreat with in March is particularly gifted in this area and absolutely  LOVES it. As we've been video chatting, she gets so excited and lights right up over the technical stuff like I do over bag tricks. All I can say is THANK YOU because I can learn it but it's not my first love. I really appreciate her helping me AND I get to return the favour by helping her with her project. We are supporting and encouraging each other and holding ourselves accountable with bi-weekly check-ins. Again, I am so thankful. I am benefiting tremendously in multiple ways. 

If you would like to know when the pattern and the workshop are available, please sign up for my newsletter

AND... I'd love to know what kind of information you would like to see me develop around bag making? Have you made a bag before? How was that? When you buy or make a bag, what are the key ingredients it has to have? I'd really love to hear. You can post in the comments below or email me at myrna@myrnagiesbrecht.com.  Thanks.

Talk soon - Myrna

Grateful - for Lynn

Friday 27 May 2022

And Then Maybe Became Definitely

The end of this bag became quite frustrating. There were steps that I had to redo several times and it still didn't turn out as I'd hoped so I was already contemplating making it over and then...


... maybe became definitely. It was finished and photographed and I picked it up by the handles to hang it on the finished hook only to realize that while it was the same handle on each side, one was considerably longer than the other. Amazing that it took me that long - in that not really amusing way. It's in the time out corner right now. 


At this stage, there was a tickle of something being off only I was concentrating on getting the photograph and not really paying attention. The handles are sewn to the exterior fabric only. I could fix them through the opening in the lining but it wouldn't be easy. 


When I reached this stage, I decided it needed purse foam to give it more structure but I wasn't sure what shape to cut the foam since I was making up the design as I went along. I angled it from the side seam to the 12" width at the top only...


... it wasn't the best choice. Instead of a triangular shape, I got this rounded bump and had to sew tucks to keep the foam attached to the exterior and the sides leaning in to the middle. Several times. Because the stitching didn't always catch the foam until I stopped using clips and used pins. It's okay and not what I really wanted. 


I am quite happy with the zipper tab and I really like the handles sewn on with pearl cotton in a variegated purple. When I redo whichever handle I redo - the longer or shorter - I'll use this same thread. 


The side view is anticlimactic, not nearly as interesting as I was aiming for. I think if I remove the curve of the foam and angle it from the boxed corner at the bottom to the narrower top that it might do what I want. I really like the fabric and the overall look and think it's worth saving. It's one of the purses I want to highlight in my book. It will have a story to tell. 


Something new I tried was a zipper overlay. Typically, these are made from leather, vinyl, cork, something like that. Mine is the same fabric from an earlier point in the painting process. 


I'm really pleased with how it turned out. As always - thankfully - there are things I've learned that I'd do differently next time but I will definitely use this pocket again. I really enjoy that after so many years of making things, I am still learning. This is good. 


The lining has two pockets. One has a zippered closure and one is a double welt. They have different pocket bags cut from remnants. 


I'm trying really hard to use what I have in stash. This zipper was taken out of a previous project years ago and the end was fraying. I sewed quite a bit further in, caught the frayed end in the seam around the pocket bag, and sealed it with a fray check. 

I can feel that I'm getting more confident with making the pockets, sewing the square, trimming and turning. They are coming out increasingly more crisp and clean which is - of course - the benefit of practice. I'm still working on stitching evenly around the opening. Part of the problem is not having the correct foot. The foot I'd prefer to use is too wide and pushes the zipper around and I can't see clearly when using the zipper foot. Something to practice and hopeful find a foot solution for. You can watch for my improvement - VBG. 

Talk soon - Myrna

Grateful - developing skills

Wednesday 25 May 2022

Twelve Good Thoughts

It's interesting - in that not very amusing way - how many people are dealing with personal pressures right now. Two of my closest friends have significant trauma happening in their lives. I'm not alone. All of us are paddling as hard as we can just to keep our heads above water and it just keeps coming, like waves, overwhelming waves. 

Yesterday morning, I did clean house and I can say with complete confidence that shiny clean and fresh smelling helps. While I was at it, I put away a third of the décor items. I'm a minimalist. I've been asked before by first time visitors where my things are and even so, there was too much visual clutter. It was sitting on my nerves... agitating. 

After lunch, I went to the studio and accomplished next to nothing. It was a rough day although the steady stitch of the sewing machine and the hiss of the iron were incredibly comforting. If the sun shines today like it's supposed to, I'll be in the yard shoveling more rocks this afternoon and if not, I'll spend the whole day in the studio finishing a bag. I hope I have something to show you on Friday. I'm not making any guarantees. Today, I've got nothing. 

Here are twelve good thoughts, not my own, yet still encouraging. 


Talk soon - Myrna

Grateful
- behind any cloud, the sun is shining

Monday 23 May 2022

More Yard Work

Next week has mixed reviews... again. One site says rain and one says nice, sunny, hot weather. I'd prefer the later only the cashier at the nursery told me her boyfriend is a roofer, dependent on the weather, and VERY accurate and he says it's going to rain. Hmm... thankfully Saturday and Sunday were sunny and I got a lot of work done in the back yard. 

One of my neighbours is now working at the nursery and she said her partner was feeling bad watching me shovel rocks. He thought he should help. I asked her to thank him for me and tell him that I actually enjoy doing this kind of work and it's good exercise for me but I'd call if there was something too heavy. I didn't. I called my son instead and traded chocolate cake with whip cream for help moving a BIG rock and a tub of dirt and - of course - a hug.

I don't call him very often. I'd say that I'm saving points for my old age but it wouldn't be true. What is true is that I am very independent and I know what I want and it's much easier to just do it myself than try to explain it to someone else.  That means that when I do call, he knows that I really do need help. 


The only full sun spot in my yard is the far corner of the upper patio so that's where I put the tomato plant. It looks a little sad at the moment. Hopefully, it'll perk up now that it's in a pot. The strawberries are in a great location for me but I'm not sure it's a good one for them. I don't think they'll get enough sun. It was the only spot ready so I'll try them there for this year and see. 


The dirt is... well... dirty so I'm trying to get all of the walkways finished and contain it. The rocks on the stairs will get moved down once I get my next bag of gravel and can put a base layer underneath them. The big rock you see in the left picture at the bottom right of the walkway is the one I needed help with. I called it a rock when I called my son and he said, this is a boulder when he got here. He pulled it up out of the hole it was in and moved it over to where I wanted it and I was able to fussy shuffle it around on my own once he left. I'm okay with big rock.

I'd hoped to grade the walkway from the stairs down to the deck but it's too steep so I've added two steps using some bits I removed from one edge of the existing deck. I like re-fashioning in the yard as well as in the studio and I landscape the same way I create - start, respond to the developing yard, keep going until it says it's finished although it won't be finished this year. I've decided to wait on the wooden deck and hope wood is less expensive next year. 


The picture at left is at the top of the stairs. Once it's all filled in, you won't see the wood and the planter will be even more buried in the gravel. I think I'll put a bleeding heart in it. I have another one further up the walkway and this is the first home I've owned where I can have them; it's always been too hot. The neighbour can see that pot from her deck and she says she also likes them so win-win.

The "fence" is a headboard I'd been keeping in yard-stash. On the other side of it, I created a rock wall with some shrubs that will eventually be visible up top. The far side of the headboard is screwed to a  treated wood post that was left from my contractor building the stairs. It extends into a hole where I put gravel at the bottom and then filled it with an expanding fence post product - cement-ish - that my contractor left for me to do this year. You mix the two parts and then it grows and oozes and fills up the space. As it was doing that, I put more rocks on top so they'd also get cemented in and hold that corner very secure. It doesn't wobble at all when I push on it. 


This section is below the shrubs. You can sort-of see the curved line I've drawn with the hoe. That will get outlined with rocks. Again, I'm waiting for the gravel to fill the base. Once the rocks are in place, I'll plant the hill with shade lovers like Hosta and ferns and create a nice lush green space.

From my last house, I have a battery operated, outdoor, light fixture I want to somehow hang near an outdoor curl-up chair in that space for reading and/or writing. Right now (Sunday afternoon) I'm sitting on the upper patio, feeling the warm sunshine, listening to the creek while I type and it's amazing. Such a gift. 


These pots didn't do very well last year and I discovered why. I forgot to punch out the drainage holes although I'm not sure why they don't just punch them out at the factory. Hopefully, this year they will do better. This location is temporary since geraniums prefer more sunlight. I'll shift them forward once I've finished the walkway possibly right beside the strawberries where there is an ugly air conditioner to hide somehow. I love what it does; I don't like how it looks. These pots may be part of the solution and they'd get more sun there - hopefully enough. 


And this is the mess. Instead of carting all the tools back to the garage every day and getting dirt everywhere, I've been storing them under the upper patio along with my porch swing which will eventually have a frame and face this space so I'm thinking about how to make the view more attractive and the space still accessible. It was great last year for storing the yard furniture over winter. It's a similar problem to the air conditioner. 


Two things happened inside. I hung up this sculpture in the upstairs hallway and it's visible from the living room below which is double nice. This was the longest UFO I've ever had. I started it in fall 2004 and finished it mid 2019. I like it there.

For the carpet bag-ish fabric, I ended up stitching a 1" grid with dark purple thread. It's subtle like I wanted. I also prepared and cut out the lining and I'm ready to create the pockets. I'd planned to clean house today only I have a coffee date at 11:00 which may have been enough time but - just in case - LOL - I've put it off until tomorrow and I'll play in the studio instead. After all the yard work, that sounds like a great idea. 

Talk soon - Myrna

Grateful - a beautiful yard

Friday 20 May 2022

An Old Carpet Bag Look

Does this happen to you? Peripherally, I become aware of some thing that needs doing and at first, it's a little thought, nothing major, easily ignored. Then, I start noticing it more and more frequently and it begins to niggle and irritate. Finally, it reaches a point where I absolutely have to stop and deal with it. That happened yesterday with my pressing surface. 


I take a lot of photos here with the lamp and the natural light from the window and I'd begun to notice that the previous black and white geometric cover was distracting. Occasionally, it just didn't work and I'd fold back the pressing surface and use the white table top below only it's quite scratched and could also be distracting so I'd pull out a roll of white paper. It was getting to be a lot of work.  


When I started taking photos for this post, the nagging reached peak point and I couldn't stand it any longer. I took off the black and white cover, replaced it with beige canvas, stapled the canvas to the back like the black and white fabric had been - which is both quick and easy to do and to undo - and had the new surface done in about five minutes. It's less distracting although I'll be using a lint roller more often. That's okay. It's much better for photos so... why didn't I do it sooner? 


Recently, I discovered a new zipper method  that I wanted to try on a basic boxed corner bag. Instead of reinventing the wheel, I simply folded my existing pattern narrower until it fit on the fabric I had and then cut out the new bag with the squarer shape that... 


... you can see in this image above left. The pattern shows the original angle and the fabric shows the new one. Because it's straighter, I also straightened the lines of the cut out, corner square. 


The shape I'm thinking of is something along this line but boxier. It'll be about 12" across the top and as wide across the bottom as the fabric allowed. I don't actually know the width. I didn't measure it. 


This image shows the layers of paint I talked about in the last post. Before I went any further with paint, pockets, and other details, I wanted to know which handles I'd use and how they would be attached. These two have different ways of attaching but both are shorter in length - hand held. 


This handle has tabs and D rings, basically a combination of the last two, and is also longer with an over the shoulder length. The chalk lines show where the folds will be although the corners will be wrapped around the sides so it's not entirely accurate, just a general idea for adding motifs. 


I began the second painting session with a layer of pink paint that I drew flower shapes into before monoprinting. It created a soft haze but didn't do much else. You can't see the flower shapes. After that, I added large roses in a dark purple and then a cluster of flowers in turquoise. I liked the old carpet bag look the piece was developing but didn't think it was all the way there yet. 


Unfortunately, I don't have a scrap to play with so I'm being very careful going forward. Here I mixed a bright blue with some black paint to get what is actually a dark denim, although it looks green on the fabric, and stenciled leaves in two different sizes. I like this and I still think it needs something more.

I'm debating outlining the flowers with a felt pen and/or adding an all over grid pattern in thread that will bring the elements together. Painting the grid would be too heavy. I want it to be more subtle and the same with the outlining. I wouldn't use black, perhaps copper or silver or both in different areas. I'll try a teeny tiny corner of the seam allowance and see what I think before deciding for sure.  

A post that was very popular in the past and was in the part of the blog that's been lost was called 119 Steps to Refashion a Dress to Sweater (or something along that lines) and outlined the entire creative process of making the cardigan. I've been taking similar notes while I make these handbags to see if I want to include that information in the book... when I get to writing it. 

This week, I had the lucky fortune to reconnect with one of the women from the retreat. I thought she might be able to direct me to some resources and it turned out she was the resource I needed. We talked for well over an hour and I am SO thankful for the conversation and for her willingness to help me. I was doubly thrilled that she is also working on big project that she'd like support, encouragement, and accountability around and we've agreed to help each other. We're going to touch base again in a couple weeks. YES YES! What a gift

One question I asked her advice on was whether to focus on the book, the patterns, or the workshops first and her thoughts echoed what I'd been thinking - the patterns and workshops in tandem. So, develop this pattern and that workshop and then the next pattern and the next workshop so the pattern/workshop are ready at the same time and work together. And after that the book. This feels like the right approach and means I'll definitely have a workshop ready for the fall. I've made a good start on the first set already. 

Talk soon - Myrna

Grateful - support, encouragement, accountability