_ _ _ _ _ _ _ _ _ _ _ _ _ _ _ _ _ _ _ _ _ _ _ _ _ _ _ _ _ _ _ _ _ _ _ _ _ _ _ _ _ _ _ _ _ _ _ _ _ _ _ _ _ _ _ _ _ _ _ _ _ _ _ _

Friday 29 April 2022

That Explains The Extra Bead

Today's post is late because I had to finish making the necklace first in order to talk about it which meant finding all the parts. I really don't know what to keep where right now but I will figure it out. Working on this piece, I've decided to move the basic jewelry making tools back into the main studio, into the dresser that I took the paint supplies out of. They're for assembly so I think that'll work best but I don't really know. Time will tell. I do know it's frustrating not to have a flow that works yet but that's the nature of shaking things up. They will eventually settle. 


In the end, I don't have a new outfit for the opening tomorrow but I do have a new necklace and it will be very easy to identify the artist who made the jewelry since it's in the same style. I started with a metal ornament. 


It was hollow on the back so I filled it with epoxy clay first and then added a base to soften the edges and give more interest. I drafted a shape around the ornament and figured out where the chain would attach on paper before working with the clay. 


At first, I didn't mix up enough clay and then I mixed up too much. I bunched it around the drawing until I knew it would be big enough and then rolled it smoother and...


... cut off the excess clay next to the edge of the paper creating a fairly consistent margin around the edge of the ornament. 


I knew I wanted to add embellishment to the front as well as texture the front and back surfaces and soften the edges. I used steel wool to create this texture. 


My past experiences working with epoxy clay have never reached the point where the clay was beginning to get too hard to work with. This time, as I was rolling the balls they got harder and harder to form and stopped sticking as easily so I worked a little quicker to finish all the way round the edges and then formed the remainder into some buttons before it got too hard and mixed up more fresh clay to finish the balls with. Eventually, I'll learn how to judge the quantities better. 


Back when I entered the exhibit, I'd ordered some bumble bee jasper beads, which were quite expensive, and weren't used in another piece, so they ABSOLUTELY needed to be in this one. In the image on right, you can see that I added gold gilder's paste to highlight the texture around the ornament and if you look where the chain attaches to the pendant, you'll see my mistake that explains the extra bead on the counter. I thought I was done and then had to restring the one side. 


The large beads are polymer clay formed over aluminum foil cores. They are the muddy beads I talked about in this earlier post. The necklace is quite large - definitely a statement piece. Astrix is going to wear it tonight for her daily picture to send to her person. She goes home tomorrow only the house is so fluffy with dog hair that my allergies are acting up plus a friend is coming to the opening and may stay overnight. I'll give the house a quick vacuum right after lunch (next) and then work in the studio this afternoon. It's a grey day. Perfect studio weather. Have a great weekend. 

Talk soon - Myrna

Grateful - the luxury of making a huge, statement necklace just for the fun of it and of having all the parts and pieces in stash

Wednesday 27 April 2022

The Zippered Tote Prototype

Yesterday wasn't long enough. Over Covid, there have been days that were unbearable long although - thankfully - most were managed to be just about right however, days that were too short have also been too rare. When I'm busy and engaged from morning to night, it's delightful. 


The painting area in the garage isn't completely set up yet but it is usable. The workbench with the drawers also has doors and I want to put them on to keep the dust off the fabrics. The shelves that were up before are too long for this configuration so I'll cut them in half and mount them over the furthest workbench leaving the bead board behind the closest one available as a back drop for photography. It needs painting. This area will work for the spring, summer, and fall months. In winter, it'll be too cold but I'll figure that out then. 


In the morning hour, I started on a pair of Burda 7062 pants out of a dark denim. I've sewn this pattern before and had it drafted in two different sizes, neither of which is mine. Apparently, I'm somewhere in the middle plus it's stretch denim so I ended up redoing the side seams. The pattern is drafted with darts, facings, and a zipper. I substituted an elastic waistband and that's all I have left to finish. 

I also picked a fabric from stash to (attempt once again to) make a skirt for the exhibit opening on Saturday and I started a necklace by filling the back of this large bee charm with epoxy clay. I plan to use some  bumble bee jasper beads as part of the chain and they are yellow-orange so I decided to wear blue as the compliment to hopefully give the necklace - and the outfit - more energy. 


Paula sent me this picture when she received the necklace I made for her. She was the other instructor at the retreat in Ashland last month. Before going, I looked for images of her online to see if she wore jewelry so I could take her a piece and didn't find a single picture. It turns out she has a metal allergy. I made this necklace with a silk cord, sliding knots, and the same denim squares I showed in an earlier post. There were enough for three necklaces in total. I hope it'll be the start of her jewelry journey as I think she could make some amazing pieces with her own quilted parts. 


This is the last prototype I was working on - the zipper tote. It's made with more of the mono-printed fabrics. I'm really glad the painting area is set up in the garage now because I had so much fun making those pieces I'm looking forward to doing more. 


I'll be tweaking this pattern. Because the handles are stitched on further down and the zipper is recessed, the top has a bit of a flabby look about it, especially when you're carrying it. I prefer more structure. 


I don't typically use a recessed zipper although I think for this style of bag, it's the best option. I'll experiment with making the facing shallower. This one is about two inches.


A bag this size doesn't typically have purse feet although I could have added them just for fun... only this is a prototype and I'm still experimenting. When I get to the real thing, I'll start adding more hardware. I'm really happy with how it turned out. 


This fabric is a heavy canvas like you'd find on a frame for painting. I painted it last year while experimenting with acrylics and it's quite thick. I'd never be able to turn it if I sewed it into a typical bag. Here, I am making it into a slip pouch to fit a notebook. It works. I have several pieces like this that I want to use but I doubt I'll make more in the future and instead focus on softer fabrics. 


Astrix was exhausted by the end of yesterday. She thinks it's very important to follow me everywhere so any time I get up and walk across the room, or to another room, or back and forth between rooms, or up and down the stars, she gets up and follows me. I think she thinks I need protection - LOL. 

Talk soon - Myrna

Grateful
- a delightfully busy day

Monday 25 April 2022

Weekends With Jane

Each new lesson for the online workshop that I'm taking comes out on a Wednesday only I'm busy during the week with other things so I've been saving it and then spending my weekends with Jane - the instructor. I don't know her but I feel like I do. She's very direct, straight to the point, and says it like it is and that's how I am also so I really appreciate it, especially as I know it's a way of being that can be undervalued and over criticized. 


The course - Mini Collage - is fabulous. It involves gluing with gel medium and while I am absolutely not a glue (or glitter) girl, I am surviving it. This week's lesson was to make sixty small collages and by the end, I was less covered in glue than at the beginning. Apparently, my glue management skills had advanced - LOL. 


I've always believed that beginners need the best tools possible because the quality of the tool can significantly impact the ability to do the work, which impacts the student's enjoyment, which could have them quitting a good thing. I painted my colours onto cheap copy paper and I won't do that again. When I tried to glue down the first shape, the colour bleed so before using them I had to seal them all with gel medium. If I'd have been making an actual piece, that would have been a tough - and muddy coloured - learning curve. 


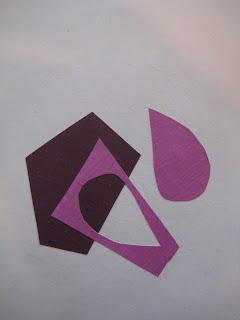
I also sealed sixty shapes from lesson two, divided them into piles of twenty along with twenty substrates, and created the collages in three sessions. The shapes were stacked and I worked through them in order responding to the piece and combining it with shapes cut from the other papers. Cutting new secondary shapes often created a left over shape and if I could - which was not always - I used it in the next collage meaning that the next collage had a starting shape plus a leftover, two things to respond to. 


Having something to respond to is a great way to get started and can really help to eliminate over thinking which is something I'm very good at. I can overthink overthinking. Instead, I picked up the shape, glued it down, and worked at getting the next piece and then the next also glued down. To quote Jane... Each collage includes three shapes. Not two, not four, not ‘about’ three. THREE. 3. 


I would guess that all artists think in their primary medium. I know that I think in fabric and thread so while there are only three shapes on the substrate, in my head there are other lines and textures created by layering and stitching these forms. Judging by the samples shown in the workshop description, I am guessing we will be making marks at some point. We'll see. 


While I haven't worked with paper before, I have done small collages with fabric and it was fun to see my familiar shapes appear. One of the students likened them to Inuit or Native American shapes. I also see Japanese forms. I think it's part of my minimalist nature. 


I really enjoy layering and seeing one shape through another. As I worked through the sixty collages, I became aware of familiar compositions, another name for my style. 


My favourite compositional form is tension where there is a focal point and a secondary focal point of almost equal significance. You can see it in these two collages. You can also see wrinkles and a lack of smoothness to the gluing. This was another flaw of the copy paper. It was so thin that the surface rubbed off if I tried to smooth it for too long and it easily wrinkled. Jane calls this squeegee-ing the shape. My squeegee needs work. 


All of the earlier collages were in the first forty. This one was in the last twenty. By then, I was really pushing the definition of shape to create additional lines and shapes and implied lines and shapes. If I could cut it in one continuous line, it was a shape. That's one of the benefits of working in series. If you are willing to engage, it will grow your work.

This was the absolute best assignment I have done in any course that I can remember in a really long time. I thoroughly enjoyed it and celebrated not only what I saw myself learning but what I brought with me from my tool box of the past forty plus years. There is something delightful about being a mature artist. 


My grand-puppy is here for the week. She didn't understand at all why I couldn't pat her every time I walked a mini collage across the room to dry - with glue covered hands. On Saturday, she lay widthwise which made it really hard to get around her. Sunday, she lay lengthwise which was only slightly better. Moving the last batch was easier. She was exhausted from our long walk in the warm sunshine and went to her blanket to have a nap. I have been overindulging in just a little too much comfort food in the form of frozen cappuccino yogurt so the long walks are good for both of us. 

Talk soon - Myrna

Grateful - a creatively growing assignment

Friday 22 April 2022

Assessing My Potential

Yesterday, when I finished the zippered tote, was the perfect time to clean up the studio and assess my potential - as in the bits & pieces stashed around the studio - to see what I actually have to use going forward. I like that I now see remnants and failed projects as useful and not as garbage only too much potential can be overwhelming. I'm always aware of that and attempting to keep it under control. 


These are the painted scraps left from the bags. I want to keep them of course. I spent a lot of time, money, and energy creating the fabrics they were cut from and random sizes and shapes like these only happen organically yet are the perfect starting point for collages. As I do more painting, there will not only be yardage but more scraps. I realized I needed a system which - LOL - I'm still thinking about but that awareness led to looking at everything else I had that might need to be included in the system. 


YEARS... and years... and years ago when I bought two of these desks, I liked that the baskets would tuck underneath from the front. It meant they could be placed against a wall or face-to-face without any access issues. I have six of these baskets and two much larger ones - canvas, laundry baskets - that are kept in the work island. I went through them all and sorted the bits and pieces of potential into piles and then got rid of what didn't work... which was very little... and it's going to the thrift store. 


In the image above left, the bottom right hand pile is more of the samples I did at the retreat that I want to turn into pouches. The bottom left pile is painted scraps that will eventually become part of the system I'm still thinking about. Behind that, top left, is fabric that can be painted or needs more painting. The pile top right is of quilted pieces left over from other bags. Later, I added them to the box of other quilted pieces, mostly wall hangings I'm going to repurpose. 


The laundry baskets contained a mix of things. These are Chinese knots made from bias strips wrapped over cording. They can be separated and finished to be beads or can work as an accent or a closure on a garment... or a bag. 


And these are from a bag I made a few years ago for a friend's 30th birthday. I started with canvas painted purple because I had a lot of canvas and a lot of purple paint - five large containers originally bought to paint my couch that I ended up recovering instead. Since there is more canvas and more paint left, more purple is bound to happen. 


These are the remnants from two teepees that I made for my grandsons using drop cloths. It was too much beige so I dyed them and really like the way that turned out. Drop cloths are an excellent way to get a lot of canvas fabric for a reasonable price as are...


... chair covers. Before I moved, I had two Ektorp chairs from Ikea that weren't going to fit in my new and smaller living room. When I bought them, a beige cover was $29.00 so I bought an extra one and took it apart to make a pattern intending to make more covers in different fabrics. The beige fabrics in the top image are from that cover and the grey ones are from two more that I kept when I gave a friend the chairs.


Here are the pieces from the beige cover folded and stacked.  The pile is about five inches high. Double that for the grey covers. That is a LOT of fabric plus...


... the piping that came out intact can be re-used and the cording from the strips that separated while taking the seams apart can be used to make new piping and/or more Chinese knots. 


Each chair cover had two sections - one for the seat and one for the back - that already have a zipper installed. Again... perfect for bags. I've been thinking about the kind of series work that could be done with tent remnants, or chair covers, or beige or grey canvas. SO many possibilities. And exactly the kind of challenge I enjoy. 

Talk soon - Myrna

Grateful - potential for "free" projects.